Automated humidifiers can be very expensive which is why a lot of home growers decide to build their own humidifiers which are just as reliable and half the price.
Like everything in home growing, you can make your humidifier as cheap and basic as you would like or more automated and higher tech. This guide will run you through two designs, a low-tech version and an automated version
1. Basic Low Tech Humidifier:
Equipment
-
Plastic Tote
- You want it to be opaque so light doesn’t promote algae on the inside
-
Ultrasonic Fogger
- A 12 disc fogger will produce enough fog for most tent sizes
Now with this version of the humidifier you will need your exhaust fan to be pulling air out of the tent causing a negative pressure. This will cause the fog to be sucked out of the tote and throughout the grow space. It is wise to place the tote on the opposite side as the exhaust fan to allow for optimal fog dispersal. Additionally having the open air inlet on the opposite side as the fan is beneficial to maximize the air flow across the room.
Steps:
- Place fogger at bottom of tote
- Place tote in position
- Plug fogger into outlet (outside tent)
- Start Fan
This humidifier is super easy to build but it is limited due to having to manually fill the tote with water when it is low and depending if your fan is on a timer or not it will only disperse fog when the fan is running.
2. Automated Humidifier:
Equipment:
-
Plastic Tote
- You want it to be opaque so light doesn’t promote algae on the inside
-
Ultrasonic Fogger
- A 12 disc fogger will produce enough fog for most tent sizes
-
Humidity Controller
- For controlling the fogger
-
Float Valve
- Attach to a hose to keep water level constant
- I highly recommend brass, I used the cheaper plastic ones before and they all end up not working and causing my tote to over flow and flood.
-
Fan
- Only necessary if you leave tote outside tent. If your tent is not air tight and your exhaust fan doesn’t have enough pull to bring the fog into the tent the fan helps push the fog into the tent.
-
Ducting
- If leaving tote outside the tent you need to duct the humidifier into the tent
-
Ducting Bracket
- To connect the fan to the ducting
- Air Filter Cloth
Making this humidifier is a bit more complicated and expensive but it is self sufficient. You can take two methods when building this one. You can either use the same principals as the basic method and just leave the top of the tote open inside the tent and let the natural air pull up the fog or, you can place the tote outside the tent and duct it into the space. This allows for more room in your actual tent.
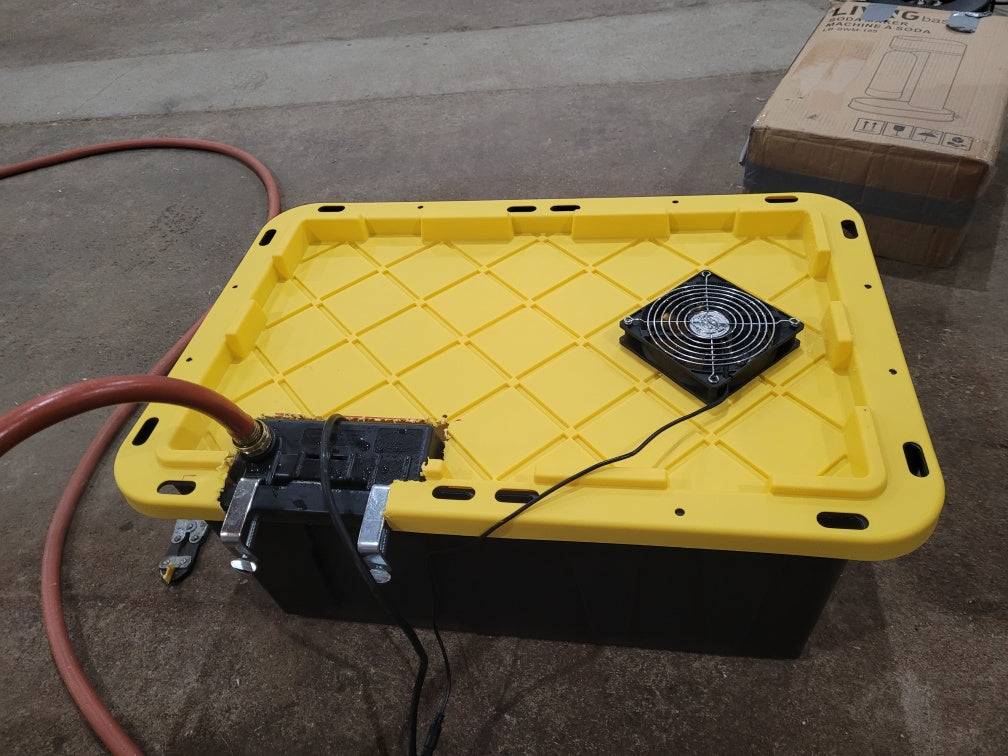
Steps for Placing Outside the Tent:
- Place tote in desired position
- Cut a hole in the lid on one side for the air intake and cover with an air filter cloth, fasten with duct tape
- Cut another hole on the opposite side of the lid for the ducting and fan
- Fasten the fan to the underside of the lid so it blows air out of the tote
- Attach the ducting bracket to the outside of the same hole as the fan, then attach the ducting to the bracket
- Place the fogger inside the tote and measure the height of the shut off valve (should be as high as the shut off switch on top of the fogger
- Drill a hole to fit the water shut off valve and screw the valve in tightly to ensure no leaks
- Cut a small hole in the lip of the tote so you can feed your fan and fogger power cords outside the tote
- Connect the fogger to the humidity controller and plug in fan
- Connect a hose to your water shut off valve
- Set your controller to desired humidity
- Test your humidifier
- Tweak as necessary